Monday, November 23, 2015

Making connections: Learning math using concrete examples

Like in most classroom these days, in my classroom I have students of varying needs and abilities. This means that I need to plan my lessons and find ways to motivate and engage everyone, as well as reach the greatest number of students, in order to have the majority of my students understand the concepts being taught.

There are many ways of doing this, such as by playing games, by role playing and by providing manipulatives to students. By providing concrete examples, students are more likely to remember the lessons because they will have learned them through visual (eyes), auditory (ears) and kinesthetic (through motion or touch) experiences. Even if students don’t understand everything, they are more likely to get the gist of it and catch on during follow-up lessons and activities.

An example of an activity I did involving this type of learning was when my fourth grade class was learning about the Cartesian plane.

I started by using the tiles on my floor to create a gigantic Cartesian plane. I used circular stickers by Avery to mark the coordinates on the plane and Post-its to identify the vertical and horizontal axes. 


We talked about maps and how we use them to find destinations.
We then compared the Cartesian plane to a Battleship board game, where players must sink battleships that are on hidden coordinates. We looked at how the vertical axis on a Cartesian plane is identified with numbers rather than letters. We discussed how in the Cartesian plane there are zeros, while in Battleship there aren’t any.

We then moved on to talk about another difference between Battleship and Cartesian planes. When we give coordinates in Battleship, it doesn’t matter which order you say the letter or number in, because there is only one row or column labelled C, for example, and one column or row labelled 2. However, the Cartesian plane can be tricky because you need to know the order in which to read the ordered pair describing coordinates. 

I needed to provide visual cues and reminders to my students. I used some Scholastic book display boards and stuck some signs onto them to make them visible to all students.


The next step was to provide ordered pairs on construction paper strips to my students, so that they could work with partners and figure out where to plot their points.


Once their points were plotted, we checked with the entire group to see if they were plotted correctly. We discussed which were correct and why, and figured out why the incorrectly plotted points were in the wrong position and made adjustments to plot them correctly.


I made sure that every students had a turn plotting points on the Cartesian plane before trying to translate what they’d learned to apply it to a 2-dimensional example within their workbooks. More than 90% of my students were able to complete the tasks on their own, without further explanation, because we has explored Cartesian planes in a concrete, hands-on way, while making connections to their prior experiences. 

If you have used similar means to teach math concepts with your students, please share them in the comment section below, or on my Facebook page, by clicking here.

Until my next blog post, don't forget to be the change.


Chantal


Wednesday, November 18, 2015

Journal writing with a purpose

I absolutely love doing journal writing with my students.

I do journal writing for several reasons.

The first is because my students and I get to know each other well and it helps us build a relationship. Students can express their thoughts and opinions without being interrupted. They enjoy communicating directly with me and I enjoy responding to them.

The second reason I love journal writing with students is because journals provide insight to me about what students need to learn, either having to do with grammar, spelling, sentence structure, content organization or other language arts related concepts. I know from their journals what to base my next writing lessons on.

The third reason I like journal writing is because I can see students’ progress as I flip through the pages of their books. I can see how well they apply my lessons into their writing. I get a good sense if students have assimilated the information from my lessons properly or if we need additional practice.

A student's journal from my fifth grade class


When I do journal writing with students, these are the guidelines I like to follow:

1 1)   Have several topics for students to choose from.

I want for my students to have a lot to write. When I choose topics, I think it is important to spark the desire to express themselves and share their thoughts, their opinions or everything they know about a topic. When I provide only one choice, I cannot be certain to inspire a student to write about a topic. It is better to provide options.

Topics in all grades should be open ended questions. With younger students, they can be expected to respond to journal prompts with complete sentences. With older students like those whom I currently teach, I expect them to provide explanations, justifications and details in their writing.

Examples of prompts for journal writing could be:

What can you, a fourth grader, do to make the world a better place?
Why do you think someone would steal a book from class?
Why should you be allowed to take the class pet home?
Explain why winter could be someone’s favorite season.


   2)   Make expectations clear.

My students know that when I will be reading their journals, I will be checking their work for correct use of grammar concepts that we’ve learned, such as possessives and correct use of apostrophes. They know that I expect students to skip lines to make it easier to read their work and to edit and revise it. Students know that I expect them to provide explanations and details in their writing. Students know that I expect them to check their work.

   3)   Make time for students to share their journals with their classmates.

Journal sharing has many benefits. However, I feel that it is important to agree on guidelines and expectations about respect before the first journal is shared in the classroom. 

Knowing that students might be asked to share their work with their classmates motivates them to be more careful when checking their work. They are more likely to catch mistakes before reading their work aloud. Also, when students read their work out loud, I find that they are more likely to catch their own mistakes and make the appropriate corrections to their work.

In my class, when it is time to share our journals, we sit in a circle to be able to face one another.

When students share their work and hear each other’s comments, they are all more likely to try to make the same improvements to their journals the next time they write.

When students listen to their peers share their journals in class, they are asked to:
-        Think of something positive the writer did, such as the way they used a certain adjectives to describe something.
-        Share constructive criticism on how the writer can improve to their work. For example, a classmate could suggest a synonym for a word that was repeated often in the journal entry.

    When students share their work and hear each other’s comments, they are all more likely to try to make the same improvements to their journals the next time they write.

    4)   Respond to your students’ work appropriately.

     If I want students to feel comfortable pouring their thoughts and hearts out onto their paper, I do not correct their work.

     I’ve learned that if students find their work covered in ink when it is returned to them, they are less likely to take risks and to write all of their thoughts. They are more likely to stick to writing what they are sure they can spell correctly and to topics that are familiar with.  

     Instead, I choose the most repeated or important mistake from their writing and model the correct spelling or use of grammar so that they can then go back and make the corrections themselves.  I use the information acquired from the journal entry to direct my next lessons.

The words two, chicken and vegetables were misspelled.
I made sure to include these words in my response to my student. 

   5)   Expect students to make improvements to their work.

     I expect my students to go back and check their work. If I have completed a grammar lesson about the proper use of possessives, then I will expect my students to go back and check their work. 

     If there were some recommendations made by a classmate to improve a journal entry, I expect all of my students to go back and see if they could make the same adjustments to improve their writing. 
    
     I also expect my students to read my comments and check their work if they noticed the correct spelling I may have used for a word they had misspelled in their text. 

Note the editing in the journal entry, with inserts and eraser marks, from peer review and noticing ways that the text could be improved and clarified. 
    
    Please share in the comment section below, what you like or dislike about journal writing with students and the ways you use journals to teach your students about writing. 

Wednesday, November 11, 2015

Engaging students with the Plickers app


For those of you who aren’t familiar with the Plickers, it is an app that allows teachers to project multiple choice questions on their Smartboards through a live feed and for students to answer the questions them by holding up their Plickers card, a QR code card, upright in the position that represents their answers for their teachers to scan with the app on an iPhone or iPad.


Are you confused?
That’s okay.
Here’s what a Plickers card looks like.


In my class, I have written each student’s name on their cards and have had my students color code the possible responses.

In order to prevent students from losing their cards, I have made simple tuck in pockets inside students’ desks to ensure that the cards all have a safe place to land. I just took a strip of construction paper and taped in on three sides to slide the Plickers cards into. 


When I start using Plickers with a new group of students, I initiate them by asking general questions, such as "What is your favorite colors? Favorite seasons? Favorite school subject?", etc.

I project the questions and the possible answers on the Smartboard for all students to see, with the Live Feed view. For the purpose of the exercise, I choose the option to display student names and their responses on the screen. Students practice holding up their cards and holding them in the right direction.


With the teacher’s device (my iPad or iPhone), I could see which cards had been scanned, as well as the answers they provided.


Meanwhile, on the Live Feed screen on the Smartboard, students can verify if their card has been scanned properly and if the response matches what they intended to display.


Now that students are familiar with Plickers, I use it to have students inform me of their Daily 5 choices, to do anonymous (to students) class surveys about the amount of time they studied for a test and I can quiz my students on any topic or concept that I choose to get immediate feedback of their understanding.


Plickers keeps a log (archive) of answers that were provided so I can check the answers in the future for reporting purposes.

I can also keep different folders for different groups containing different questions. It is really simple and quick to use.


Students love using Plickers. They like that everyone has a voice and can share their opinions and their answers with the group. 

Plickers also provides an anonymous way of providing answers and prevents students from influencing each other’s responses (no more students looking around the classroom to see who has their hand up before deciding whether or not to raise his or her hand up as well).

I especially like that now I can be spontaneous in asking student questions because they are organized and always have their Plickers cards handy! 

Try using Plickers if you haven't yet and let me know what you think in the comment section below. 

Enjoy!


Saturday, October 24, 2015

Fall Art

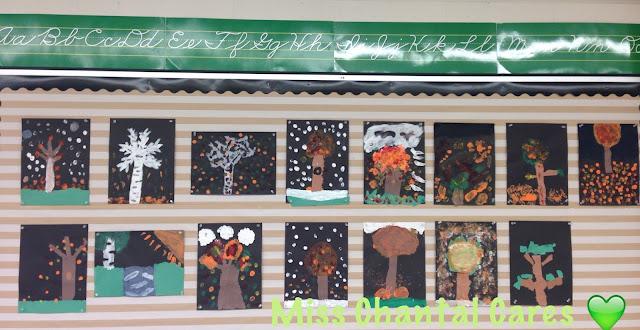
In today’s post I will be describing a seasonal art project that I did with my fourth graders today.


I love fall. Fall in south-eastern Quebec is filled with beautiful, and vibrant colors, which often stand out on a somber and cool background. This provided me with the inspiration for the art project I wanted to do with my students. We discussed the colors and the beauty of the season that we have been experiencing. Some students asked me questions, like, “What do I do if the leaves have fallen from the trees already?” I responded by asking them what they think it should look like and to tell them that if this is the way they want to represent autumn, it was fine with me, it is their art project.


My art objectives were the following:

-        To mix media types
-        To reinforce lessons we have had on color schemes
-        To allow the use of only one tool for completing their projects
-        Not to provide a template or an example

My personal objectives for my students were:

-        For students to feel comfortable creating without an example
-        For students to feel freedom when working on their pieces

The materials I provided were the following:


-     -   Black construction paper 8 ½” x 11”
-     -   Pieces of brown, yellow, orange, red and green construction paper
-     -  Water-based paint (such as tempera) in yellow, orange, red, blue, green, black and white. 
   - An empty pallet to mix the paint on. 


The only tool students were permitted to use were their glue sticks.
The instructions I gave were:

-        You must use the black construction paper as your canvas. It must be in upright position.
-        You may not use scissors or paintbrushes.
-        You must use both construction paper and paint in your artwork.

I then let the students loose. Students took the materials they needed and worked using different strategies, blending the media in different ways to complete the task assigned to them. There were no two pieces that were alike and they all adequately represented the season’s beauty.


When everyone’s work was displayed on the bulletin board, we observed it and talked about the color schemes that we used, how students were able to create different effects with their fingers when painting and how the media were mixed to produce different effects.
We also talked about how it felt to create these pieces. Students felt creative, free and some said it reminded them of younger days when they could finger paint and create what they wanted to.

This project has allowed me to evaluate student understanding of colors, textures and their ability to follow instructions. It also helped me to get to know their little character traits, such as a serious dislike of touching paint with bare hands.

If you decide to try it out with your students, let me know how it turns out!

Chantal


Tuesday, October 20, 2015

Getting class birds and teaching with them

As a follow-up to my Birds on the Brain post, as promised, here is what I have learned about finding birds for in the classroom, as well as the materials needed in order to take care of them. Also, I will go through the advantages and disadvantages of having different types of birds in the classroom.
My three year old daughter, meeting Junior when he first moved into my fourth grade class.

When I first started this adventure, I began by looking for zebra finches, since I had previously had a pair and knew that they are low maintenance. I searched on kijiji.ca, a Canadian equivalent to Craig’s List. There were several people who were looking to sell finches. There were pet shop owners, elderly people who were too busy or unwell to look after their birds and there were breeders who wanted to sell their finches. I found that for the type of experience I was looking to obtain for my students, I needed to be sure that the birds I purchased had already reproduced.

I decided that it would be best to buy my birds from a breeder, who was trying to downgrade and lower the number of birds that she kept for reproduction purposes. Because she was a breeder and already had an extra cage for the finches, she was selling the birds fully equipped with the cage, the nest stuffing, bird feeders, water containers, some bird food and lots of information to help me take better care of the birds. As a bonus, when she learned that I was purchasing them for my classroom and that students were going to benefit from the experience of having the birds in the classroom, she accepted my very low offer of only $30 for everything.

The finches have been incredible.

Advantages of having zebra finches:

They are low-maintenance, they require little attention and they are not noisy. They make the littlest chirps once in a while, which are endearing and not at all annoying. The finches are not demanding at all. In addition, they laid eggs almost every month for the first few months after I got them and my students had the opportunity to see the chicks hatch and grow to maturity.
 
Ping and Pong, my first zebra finch couple

Salt and Pepper, two of Ping and Pong's chicks


My next feat:

This year, with older students, I wanted to find another breed of bird that I could use in class to deepen my lessons with my new students. 

Originally, I had several criteria for my search:
I wanted a bird that we could handle and take out of the cage.
I wanted to use a bird to help calm and soothe my students.
I also wanted to have a different type of bird that the students could compare the finches to.

Lastly, I wanted for my students to experience the hatching and growing of another type of bird than finches.

I made a lot of phone calls. I called pet shops, breeders and people from kijiji.ca. I asked questions about all types of birds that may meet my needs for in the classroom. I read blogs, consulted various websites and realized that I could narrow down my search because I didn’t want a bird that lives too long (I can’t handle a fifty year commitment to a bird) and I wanted a bird that would be friendly and would not become aggressive with students. I also wanted to choose a bird that wasn’t too noisy or too expensive to take care of.

I visited Bourke parakeets, because I was told that these were ideal for in the classroom because they can usually be handled and they are quiet birds. When I saw them, I was not drawn to them at all. These little pink budgie-like birds were cute enough but very fearful and didn’t seem to want to be handled.

I saw Quaker parrots and Catherine and Celeste Touis, but I was told that these could be aggressive and that their nibbles hurt.

Lovebirds:

I decided to go for lovebirds. Peach-faced lovebirds, to be exact. I learned that the peach-faced variety is the least expensive to purchase from pet shops or from breeders. I finally found an individual on kijiji.ca that had two breeding pairs for sale. When I went to visit them, I originally wanted to purchase one pair of breeding birds and a baby lovebird that hadn’t found a mate yet.


(Fun Fact: Lovebirds who are already in pairs are difficult to handle. They are so attached to one another that they hate to be separated. However, when you have a single lovebird, it becomes attached to you!)

Jewel, Junior's mother

Blue, Junior's father


When I was visiting the birds, the owner wanted to sell them with the cages. He was selling them for his teenage son who had promised to take care of them but didn’t. He also had some babies from the breeding pairs for sale. I made an offer to purchase one pair and one baby with the cages. When he learned that I was a teacher and that the birds would be going into a classroom, he offered to sell both pairs, a baby and the cages, nests and equipment for only $130. (Lovebirds, in the pet store, usually cost at least $75 each.) I jumped on the opportunity and brought the birds to school with me.

Advantages of having lovebirds:

They are an entirely different type of bird from the finches. Their anatomy is different. They use their beaks to move around and climb things.

The single bird, whom we named Junior, is comfortable staying on students’ shoulders when they work and on my shoulder when I am teaching. The kids are already used to seeing Junior lose in the classroom. They have already become quite attached to him, and he to us.

The lovebirds are beautiful birds that are still somewhat low maintenance and are rather inexpensive versus the other types of birds that may have been interesting for a classroom setting.

The lovebirds have an interesting demeanor. It is very educational to watch them prepare their nests, to observe their interactions with each other and it will be an awesome experience for students to learn how to hand-feed the babies.

Disadvantages with lovebirds in the classroom:

With the number of them that I have in the classroom (5 in total), they can be quite noisy. Junior on his own doesn’t make a sound. The pairs, however, like to communicate a lot, especially in the morning. They are less noisy when I am in the classroom but when my colleagues enter the room to teach the birds do not behave the same way with them as they do with me.

Lovebirds require grooming if you want to be able to handle them and take them out of their cages. I have learned from YouTube videos how to trim the feathers on their wings to keep them from flying away and hurting themselves. It is quite simple and easy to do. Junior slightly nibbles on and tickles the students but if his beak gets a little bit sharper, I will have to file the tip to make sure he doesn’t accidentally hurt one of the students. Junior got used to me quite quickly and I am not worried about doing the filing myself. 

Conclusion:

So far, I have enjoyed having both types of birds in the classroom. My students are drawn to both types of birds for various reasons and look forward to the greeting them and taking care of them every day.

Jewel, on my shoulder while I was teaching
My unit, Birds of a Feather Unit, available for purchase on TpT, has proven to be useful and interesting to the students. It has helped them to make connections and to organize themselves for research projects, persuasive writing and sorting information.

Birds of  Feather unit, available on TeachersPayTeachers


If I were to do anything differently, I would have stuck to one pair of lovebirds and one baby, rather than two pairs, thus reducing maintenance time, cost and noise. Otherwise, I am enjoying this project and am loving the kids’ engagement and motivation for the projects revolving around this topic.


I would recommend this project to everyone!

Thursday, October 15, 2015

Birds on the brain

In today’s post, I will be sharing how birds can contribute so much to a classroom setting, to students’ learning and motivation, and how they can be the source of many engaging and pertinent lessons and activities.

Last year I got a pair of zebra (mandarin) finches for my classroom. They are a breeding pair that my students and I named Ping and Pong.

Ping and Pong (Zebra Finch couple)


 In the few months that we had Ping and Pong in the classroom, they had several sets of babies. 

First set of baby finches

Looking at the inside of a rejected finch egg and comparing it to a Canadian dime.

The contents of a finch nest

Salt and Pepper, two females babies from Ping and Pong


I created my Birds of a Feather unit for grades 1 to 3 to use with my students. It was very effective and engaging. The kids loved it! 


Students were able to use the Bird Observation journal that is included within the unit to note their observations and write about the changes that they saw the parents and babies go through. 


Students learned about grammar, the difference between facts and opinions and practiced writing instructions on how to take care of birds and shopping lists for items you need to have if you want to have a pet bird. The students liked coming into class, hearing the birds chatter away gently and mostly found the birds to be soothing to have in the classroom.

This year, I am teaching older students. I wanted to find a way to make the project a little more interesting and age-appropriate for my fourth and fifth graders. I purchased two breeding pairs of lovebirds to provide the opportunity to my students to compare the daily maintenance, care and joy of having lovebirds versus that of finches. With them I got a baby lovebird, which is a chick from one of my new breeding pairs, which the students can manipulate and handle and have on their shoulders while they work.

The birds, while adding life to the classroom, are also adding a feeling of being grounded and a sense of calm. The students are motivated to learn about them and to learn anything that may have to do with birds. I used my purchasing of the birds as a math situational problem for my students to solve. I have asked students to write letters to convince me to let them be appointed with bird caretaker jobs. Students also started inquiry-based projects, researching information to answer their own questions about our class birds, as well as other birds in general. Our guided reading groups are named after birds. Students had to come up with names for our new birds. (They had to choose book characters that went together for each pair of lovebirds).

Blue and Jewel

Romeo and Juliet

As a result of all of this students’ interest-based learning, I have created activities to complement my Birds of a Feather unit, including activities about the anatomy of a bird, updated bird observation journal pages and no prep persuasive writing activities. I have also added a KWL chart and a bird comparison chart. Lastly, there are new math problems that are appropriate for fourth grade that you can download as a part of the unit, or as a freebie.

Follow me on Facebook at Miss Chantal Cares to be notified as soon as the new sections are added to my TpT store, or simply follow me on TpT.


Also, I will soon be posting about how to obtain birds for the classroom, as well as the realities of taking care of them in a classroom environment.